Description
Here is our shop car during the tuning phase on base wastegate pressure(7psi):


$2,499.00
Aug 29, 2022: As of right now we are 100% out of stock, we are attempting a small production run of 15-20 sets. If you wanted to get locked in on one of these, please email on3.greg@gmail.com your full info. We can contact you if the production happens but there is a 50/50 chance still this system is going to be discontinued if suppliers are not able to fulfill some of our custom items we build for this kit.
After a long development process, we are finally ready to introduce our first generation Camaro F-body turbo system. During the prototype phase, everything went exactly as planned and developed with our 1969 frame off restored Camaro. The car was swapped with a stock Gen. 3 5.3 engine, small turbo cam and upgraded valve springs. Other than that, its a pretty much stock engine and head combo. First time on the dyno, we pulled the car on gate pressure, utilizing our On 3 72mm t4 turbocharger and made a solid 525rwhp to the tires through an unlocked 4l80 automatic transmission. Keep in mind this was just our base setup, with the converter locked we should see at least 550rwhp on the 7psi setting. With that being said, this system carries the potential to support 1000HP depending on supporting mods, turbo selection, etc.
When we started this project, we knew customers would want to have creature comforts if possible. So we started our design with retaining a factory LS1 power steering pump. Our custom designed forward facing turbo headers will clear the pump location on the driver side. The next key feature was to retain air conditioning for those that want to utilize a kit such as Vintage air. When retaining AC, you will be required to use the 510 compact compressor and must be located using a low mount bracket on the lower passenger side.
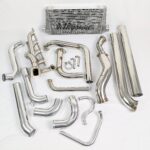
Overall we wanted to offer a system that virtually any mechanically inclined individual could install themselves in their own driveway or shop. Our single system design checks all of those boxes as well as keeping it affordable. We located the turbo on the passenger side of the engine bay as you will see from the photos. The headers are made from an extremely durable 3.0mm seamless wall 1.87″ diameter primaries. From there the crossover is fabricated from a 2.5″ 304ss and runs up to our T-4 turbo flange. Out of the turbo the downpipe is 3.0″ and steps to a single 3.5″ as it works its way back to the trans tunnel. At that point we have a merge that splits it into dual 3.0″ which you can either dump the exhaust or build the cutback from there.
Moving to the cold side, we designed it all from 6061 aluminum from the turbo to intercooler and intercooler to throttle body. All tubing is bead rolled for those running a little higher boost application to keep the couplers clamped securely to the tubing. In order to further assist with never popping couplers off under boost, we supply all stainless steel t-bolt clamps to get a solid 360 degree clamping pressure around the couplers. As far as the couplers go, we include are proven custom silicone 5-ply design. When it comes to cooling the air charge temperature, we designed a one-off air to air, bar and plate core. This is unique to the F-body specifically and fits perfect in this application and also has no problem with RS hidden head light doors. We ensured on our project car we had the RS option and has zero interference.
It all comes down to the turbocharger in order to make all the power our customers are looking for. We chose to go with the fairly new released, On 3 Performance 72mm, journal bearing, T4 housing and v-band outlet. This turbocharger features our custom anti-surge compressor cover, cast aluminum compressor wheel and a 68mm exhaust turbine. Our 72mm turbo is a perfect option for those looking to support up to roughly 650-675rwhp. As you will see we have a number of other turbocharger options if you are looking for upgrades such as CNC billet compressor wheel, ceramic ball bearing CHRA, or turbochargers that can support higher HP numbers.
http://ls1performance.com/index.php?route=product/product&product_id=56
https://www.dirtydingo.com/shop/product_info.php?cPath=342_387&products_id=1703
https://www.holley.com/products/engine/oil_pans/engine_swap_oil_pans/parts/302-1
Here is our shop car during the tuning phase on base wastegate pressure(7psi):
You must be logged in to post a review.

musclev8cars –
Kit arrived very fast! Welds are legit! Gregs customer service was amazing! Have yet to install kit will do a follow up review after otherwise seems spot on and cool company!
Thanks Guys